What makes a good sample
- Solid and fixed in place. The Mössbauer effect needs the iron atoms to be held in a solid, so they can absorb gamma rays without recoiling. Liquids and wet pastes have to be frozen.
- Thin and even. Gamma rays that pass through holes or thin patches miss the iron, which makes the lines shallower. Patches that are too thick broaden the lines and distort the relative areas.
- The right amount of iron. Too little and the measurement takes far longer. Too much and the sample absorbs so strongly that the lines become distorted.
- Protected from change. Fe(II) can oxidise in air within minutes, and drying can transform some minerals. Prepare oxygen-sensitive samples in a glovebox and only take them out in a well-sealed, oxygen-free container.
A well-prepared sample usually gives a usable spectrum within about a day. Environmental samples with little iron can take longer.
For soils and sediments, Thompson and others (2025) give a fuller guide to preparing, measuring and fitting samples, with decision trees to help choose an approach.
How much sample do I need?
The ideal amount depends on how much iron the sample contains and on everything else in it, because all elements absorb some of the gamma rays (Rancourt and others, 1993). As a rough guide, 30 to 40 mg of a pure iron oxide is plenty for a powder holder, and samples with less iron need more.
If the amount you have is too small to spread into an even layer, mix it with an iron-free, unreactive powder such as glucose or boron nitride.
Not sure if your samples are suitable?
Please get in touch before you prepare them. Samples with little iron, unusual compositions or small amounts of material can often still be measured, and it is much easier to plan this together than to repeat a preparation.
Three ways to prepare a sample
These are the methods we use for measurements in transmission. Each holder can be cleaned and reused by soaking it in 0.5% oxalic acid for 2 to 3 days to remove all traces of iron, then rinsing with deionised water and drying.
1. Filtering a wet sample
Good for samples taken from a liquid, such as microbial cultures or sediment slurries. It is relatively easy, but filters block quickly, which can leave too little iron on the filter and lengthen the measurement.
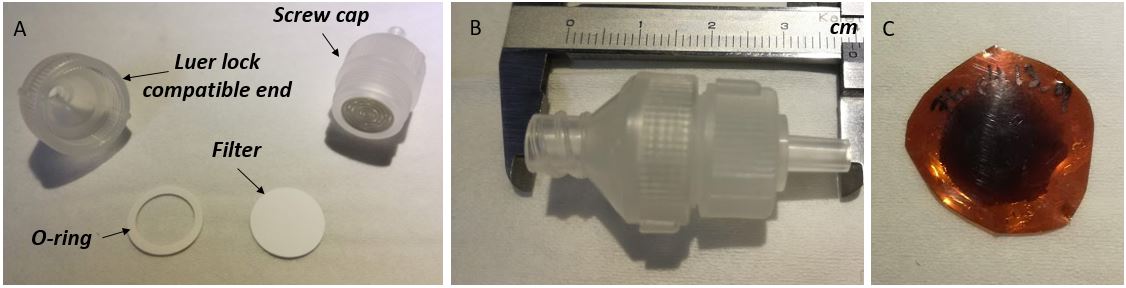
You will need a Luer lock end, an O-ring, a screw cap, a filter (1 cm², 0.44 µm pores recommended), a Luer lock syringe with a needle, and Kapton tape.
- Place the O-ring inside the Luer lock end, then the filter on top, free of its protective paper. Screw on the cap.
- Cut two pieces of Kapton tape and lay one down, sticky side up.
- Draw about 2 ml of sample into the syringe, adjusting the volume for how much iron your sample contains. Remove the needle and attach the syringe to the filter holder.
- Push the sample through the filter. If the plunger becomes hard to push, stop, as the filter already holds enough material.
- Unscrew the holder, lift out the filter with tweezers and blot it on tissue paper to remove excess liquid. Keep the O-ring for reuse if it comes away cleanly.
- Place the filter on the sticky Kapton tape and lower the second piece on top, sticky side down.
- Press the air out with the back of a pair of tweezers, working around the sample rather than on it, and leave a small channel for the air to escape. Then close the channel.
- Label the sample, place it in a container and store it frozen (−20 °C or colder) until it is measured.
- No drying needed, so sorbed iron and wet minerals can be measured.
- Can be done in a glovebox.
- Filters block easily. Several can be stacked, but use no more than three, or the sample becomes too thick.
- The sample needs to stay frozen in case of residual moisture, so it can only be measured below room temperature.
2. Dry powder in a Plexiglas holder
Good for air-dried or freeze-dried samples. Our holders were made in our workshop, but a similar design is straightforward to make.
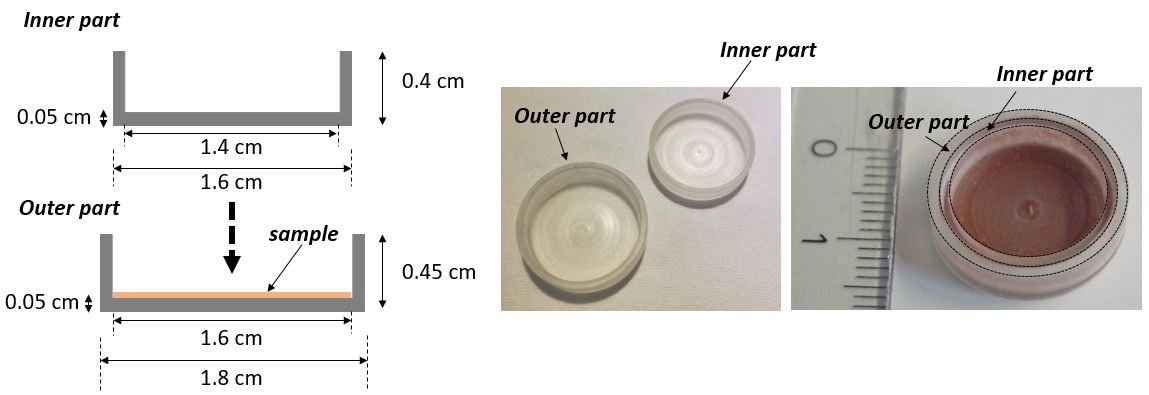
You will need the inner and outer parts of the holder and a small piece of Parafilm. Check first that the two parts slide together and apart smoothly.
- Grind the sample to a fine, even powder, about as fine as talcum powder.
- Weigh the sample into the outer part. As a rule of thumb, 30 to 40 mg is enough for a pure iron oxide. Samples with less iron need more, but about 150 to 200 mg is the most a holder can take and still give a good spectrum.
- Spread the powder into a fairly even layer, then gently press the inner part into the outer part.
- Rotate the inner part back and forth to spread the sample thinly and evenly.
- Hold the holder up to the light and look for holes. If you see any, keep rotating, or take out the inner part and spread the powder again.
- Wrap Parafilm around the edge so the two parts stay firmly together, and store the sample until it is measured.
- Quick and straightforward.
- Works at all measurement temperatures.
- Can be done in a glovebox.
- Some samples change as they dry, so the drying process may result in a sample that does not represent the original.
3. A viscous liquid frozen in a cap
We rarely use this method, only for samples that cannot be filtered or dried. It uses Teflon caps made in our workshop.
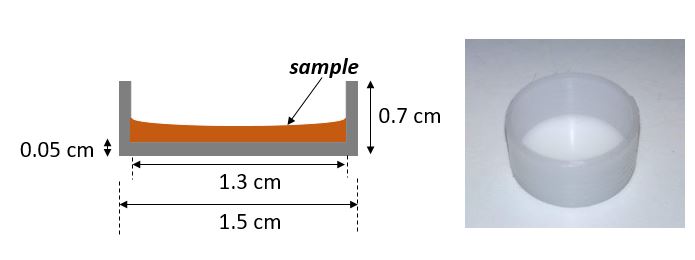
You will need a Teflon cap and Kapton tape.
- Place the cap on a flat surface and add the sample. The right volume depends on the iron content, but about 150 µl works well.
- Seal the top of the cap with Kapton tape.
- Keeping the cap completely flat, freeze it overnight, then store it frozen (−20 °C or colder) until it is measured.
- An option when filtering and drying are not possible.
- Can be done in a glovebox.
- Can only be measured below the freezing point of the sample.
- Hard to judge the best volume without knowing the iron content.
Further reading
- Gütlich, P., Bill, E. and Trautwein, A. X. 2011. Mössbauer Spectroscopy and Transition Metal Chemistry: Fundamentals and Applications. Springer, Berlin.
- Rancourt, D. G., McDonald, A. M., Lalonde, A. E. and Ping, J. Y. 1993. Mössbauer absorber thicknesses for accurate site populations in Fe-bearing minerals. American Mineralogist, 78, 1–7.
- Thompson, A., Byrne, J. M., Dreher, C. L., Grigg, A. R. C., Joshi, P., Latta, D. E., Neumann, A., Notini, L., O’Neill, K. E. B. and Rothwell, K. A. 2025. Current practices for analyzing soils and sediments via Mössbauer spectroscopy. Journal of Plant Nutrition and Soil Science, 188, 742–773. doi:10.1002/jpln.12024